Friday, April 30, 2010

MADE A MOUNTAIN OUT OF A MOLE HILL


Yep, that's what happened yesterday in a very big way.

I had lots of plans for my day off yesterday.
Some light cleaning . . . laundry . . . finishing up a few projects . . . loading up that new cabinet in my craft room . . . getting a work-out in . . . maybe doing something creative and crafty . . . even a little gardening.

The day started innocently enough by my vacuuming. As is routine, I vacuumed just inside the pantry coffin errr closet. I slipped and called it a coffin because it's so darn small - very narrow. No complaints, though. At least we have some kind of pantry.

As I was sliding the vacuum in there, I said to myself "self, you really should give this pantry a good cleaning". We keep the trash can in there, and that results in some "missed shots" and a bit of spatter sometimes - lovely. And, in the 17 years we've been here, I don't think I've ever totally emptied the pantry and gave the shelves a good wipe down.

hehe!!! Oh, there's my vacuum again making another appearance in the mirror back there! I guess you've all figured out by now that I vacuum a lot. That thing is almost never put away.

So, I did just that. Totally emptied out the pantry. Once emptied, it was obvious a lot more work needed to be done besides just wiping down the shelves. It turned into a panting project that lasted all day long!
Sorry, no pics of the before. First, it was a lot grosser than I'd realized, and second, I didn't think it was going to turn into a major project!

I decided to paint the inside of the closet the brightest white paint I had. You see, our house has all stained (blech!) woodwork and trim. It was nice 17 years ago, but over the years, I've slowly started to hate all the stain.

Anyway, the wood shelves in there were stained along with the wood support rails. Using high hiding primer, I painted those rails and shelves. Now, I'd love to have the nice open and airy wire shelving in my pantry, but that would be another job to add to the " big to-do list" that would be forever in getting done. And, I wanted the update done right then.
Cause I'm all about instant gratification!

On to painting the walls. I found some semi-gloss white latex in our vast left-over paint collection.
Mistake!
Not knowing just how long that paint had been around, it seemed okay. Cutting in it all looked good. But when it came time to roll.
OMG!!! It was horrible!
Globs of solidified paint everywhere. It almost looked like textured paint.

Now what to do? I had the pantry torn apart, half painted, and I was on a roll. Well, that meant jumping into the car, and heading off the store to buy new paint.
What a pain!
But, a perfect example of poor planning!

I managed to get everything painted and put away. Now the pantry is bright and clean and fresh! I'm glad I got it done; although, time might have been better spent working on one of the many projects I haven't finished or yet to start.


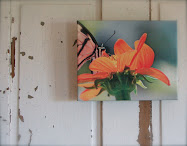
I did get that luggage stand done. I think it turned out great. I LOVE the burlap(?) strapping I used. Seventy-five cents a yard at the fabric store - score! I've got ideas swimming in my head of other projects I want to incorporate this stuff in to.


Not sure how or where I'm going to use this stand just yet, but for now it's making a nice stand for some of my smaller quilts.


We're expecting bee-u-ta-full weather this weekend - warm temps and sunshine! I'm hoping to get out in the gardens a bit, maybe some yard saleing,
ooooo, and maybe even 9 holes of golf . . .

Hope y'all have a wonderful weekend.


Thanks for visiting!
Leave a comment so I can get to know you.

Monday, April 26, 2010

COUCH POTATO


Hmm umm . . .
that's what I was yesterday . . .
all-day-long


I woke yesterday to an extremely drizzly, foggy, dreary morning. And with no real plans for the day, I figured it was as good a day as ever to start watching a few episodes of the
Showtime Series
"The Tudors - Season 1".


I am hooked now!
I have to see the next two seasons for sure. This is a very intense, very beautifully filmed, very sexy, very adult series. I was thoroughly enjoying the historical aspect of the show. Assuming the events are in fact portrayed as accurately as possible.


It had been advertised free on Verizon On-Demand until next week. And always having had an interest in watching the series, but not having premium channels, this was a good time to jump in.

Well, I had no intention of watching the
entire first season
in one day.
That's 10 episodes at an hour long each.
Do the math, my friends!
The only break I took in watching the series was to watch yet another TV show -
the final episode
I had DVR'd of Jamie Oliver's
"Food Revolution"

and to get a shower at around two in the afternoon! I didn't even cook dinner. I nicely asked Hubby go out and pick up Chinese, which he seemed happy to do.

Not only did I sit in front of the TV all day, I also binged like a crazy person on just about everything and anything LOL!!! I was taking the role of couch potato to the limit yesterday. At first I started telling my self to get up and out from in front of that TV and get something done.
Then I thought, what the heck.
How often do I take a complete day and just veg out?
Uhhh . . . like never!

My day of vegging does come with a price. I have tons to do today around the house. And I'm trying to finish up a few projects.


I've been wanting to spruce up this luggage stand a friend gave me umpteen years ago and has been in the shed for most of those years. I have been coating it with layers of black spray paint throughout the day after tearing up my hands trying to get the strapping off with a screwdriver and pliers. The staples were rusted and breaking off. It was a mess.

And Hubby rescued this cabinet from work that was headed to the dumpster. He cleaned it and repainted it for me to use in my craft room.
The big part of the job will be dealing with what is normally behind this curtain

and reorganizing all this stuff into the new cabinet, and finding new homes for some of those storage containers.

That'll be a big job!

Baseball's on the schedule for tonight, but since it's another rainy, dreary day, I'm hoping it will be rescheduled. We'll see . . .

Have a Happy Monday!


Thanks for visiting!
Leave a comment so I can get to know you.

Thursday, April 22, 2010

TIME FLIES . . .

Time has flown by the past week. Not necessarily in a fun way. Been busy with life stuff. I haven't even had time to really sit and read and comment on all my favorite blogs lately. Got a few things accomplished this week. Mostly more garden work, spending most of my time in the herb garden, and planting some lettuce and spinach.

Some sorting and cleaning of Son No. 3's closets of old clothes.
That'll mean a trip to Good Will . . .
drop off/pick up :o) . . .

Annnddd baseball has started. That will be monopolizing a good deal of our time for the next few months. We've been at the field watching Son No. 3's games three times this week since Saturday. I really don't know how we did it when all three boys were playing at the same time. One year, Son No. 1 played not only high school ball, but Little League, along with the other two boys. I'm pretty sure we felt like we lived at the baseball fields that year!

I did manage to crank out a few projects over the last week. You know when you see a project, and you JUST HAVE to do it???!!! I was like that with these two projects I'm going to share.

The first, I saw over at Jen's blog,


She had a guest poster, Kelli from


share this (click over to get the tutorial for yourself!) terrific project.

When I saw this project, I just about squealed! I have been wanting one of those elegant monogramed flags for a while, but being the frugal person I am, I couldn't stand the thought of paying the price. They're not cheap.

I'm not sure mine turned out as nice as Kelli's, but I'm super-happy with it.

Then there was this terrarium.


Wish I could take credit for this creation, but I cannot. It's straight out of the April issue of Country Living.

I was determined to make this all myself, but I will have to acknowledge that dear Hubby jumped in to help just a little. Really, I could have done it on my own.
But . . . he's a guy . . .
and small power tools were involved . . .
and, well, I guess he just couldn't help himself!


Below is the list of materials and some step-by-step instructions of the building of this cute little terrarium.

Then, lastly, remember this big, honking jar I scored at the GW?

I finally got around to creating a terrarium out of it.

I'm afraid it's shape doesn't lend too well to being a terrarium, though. The curves of this jar actually make it kind of difficult to see the plants inside. Not to mention hard to photograph.

There's one of my clay stones. It works perfect in there.


Also below, I've listed some tips on putting together a glass terrarium.

No work for the next six days. Hoping to at least start some big projects around the house. Like . . . my bedroom (no, I haven't started that project yet!) . . . painting the kitchen table and chairs . . . more gardening . . . Oye!!! My list is getting too long!


PICTURE FRAME TERRARIUM

Eight picture frames:
four 5x7
two 8x10
two 11x14

Remove glass and glazer points and lightly sand.

(for detailed instructions and step-by-step pictures, click on the magazine pic below to enlarge)
Align 11x14 with an 8x10 frame and drill one hole near top and bottom all the way through the larger frame and halfway through smaller. Screw together. Repeat with other 11x14 and 8x10 frames.

Arrange the two "L's" you've created to form a box, or base of the terrarium.

Place two 5x7 frames face down. Align a 2" mending plate (or whatever size works for the style frames you're using) Drill pilot holes and secure with screws.

I had to put my mending plates on the sides instead of bottoms because of how the frames were constructed.


Align the two sets of 5x7 frames and attach a corner bracket inside each end of the "eave".

After this step, the instructions say to attach "roof" to base with two 1" inch hinges. I did this step, but feel it could be omitted. The top does not really need to have a hinge, in my opinion. The terrarium has no bottom, so it can easily be lifted up and away from the plants when watering is required.

Next, trace the inside of an eave on paper to create a template for cutting out of 1/2" thick plywood. Cut two triangles.

Fit the wood into each end of the roof using predrilled holes and screws.

Fill holes and open gaps with wood filler, and then sand after filler has dried. After several hours, paint and distress as desired.

Replace the glass by adding dollops of hot glue in the corners of the the frames and replace the glass. Then run a bead of hot glue around the the frame outside of the glass "sealing" the glass in place.


GLASS TERRARIUM

Add stone, gravel, marbles, etc., to the bottom of the container for drainage. I used pea gravel from my garden's walkway.

Add a layer of sheet moss to keep the dirt from sifting down into the drainage material.

Fill with potting soil, and add your plants.


Thanks for visiting!
Leave a comment so I can get to know you.

Friday, April 16, 2010

LOOKING FOR A NEW GROUND BEEF DISH?


Try Pastitsio!

It's a Greek comfort food that's traditionally prepared with lamb, but ground beef works just as well. It's name is of Italian origin, and is believed to be a marriage of Italian lasagna and Greek moussaka. Another little unexpected ingredient, but very Mediterranean, is the addition of cinnamon, allspice or nutmeg. You'll see recipes using one of those. I've made it with cinnamon and nutmeg, preferring the nutmeg most. The addition of any of those spices adds a little different, unexpected flavor that's very pleasing.

I like to buy whole nutmeg and grate as I need. Store them in the frig for a longer life.

My kids love it, and it makes great left overs. It's one of those dishes that's actually better the next day. And it can be prepared and assembled ahead of time and baked off right before serving.

I warn you though, you'll feel like you're using virtually every pan/pot out of your cupboard! Like any yummy, family-friendly dish, it's worth it!

Pasta's done. Just waiting on that meat to finish browning.

This dish is combined of three parts:

Pasta
Meat Sauce
Béchamel Sauce

The Ingredients:
PASTA
1 lb dry pasta - ziti, macaroni or pene
4 tsp butter
1/4 c grated Parm cheese
1 dash nutmeg
salt and papper to taste
3 eggs lightly beaten

MEAT SAUCE
2 tbs butter
1 large onion, chopped
2 cloves garlic, crushed/minced
1-1/2 lbs ground beef
1/4 c tomato paste
1/2 c dry red wine (I used a Merlot, or you could omit adding a bit extra broth.)
1/2 c vege broth (Beef broth works well too)
2 tbsp fresh parsley, chopped
salt and pepper to taste

BÉCHAMEL SAUCE
1/2 c butter
1/2 cup flour
3 c milk
1/4 tsp ground nutmeg
1 egg, lightly beaten
salt and pepper to taste

Preheat oven to 350 degrees and grease a 9x13 baking dish.

PASTA
Cook pasta according to package directions
till al dente. Drain and return to pan.
Melt butter and pour over pasta. Add 1/4 c of Parm cheese, nutmeg, salt, pepper and toss well. Allow to cool a bit. Add eggs and toss again. Set aside.

MEAT SAUCE
Saute onion and garlic in butter until soft and translucent. Increase heat and add ground beef until browned. Add tomato paste, wine, broth, parsley, salt and pepper. Simmer over low heat for about 20 minutes.

Have you tried the paste in a tube? It's fantastic!

BÉCHAMEL SAUCE
Melt butter in saucepan. Stir in flour and cook for about 2 minutes. Pour in milk all at once and bring to a boil whisking constantly. Gently boil for 1 minute until thick and creamy. Add nutmeg, salt, pepper and cool slightly before adding egg. Or, slowly temper the egg by adding small amounts of the warm cream sauce. After egg is added, combine half the cream sauce with the meat sauce.

ASSEMBLY
Evenly spoon half the prepared pasta into the greased baking dish. Atop the first layer of pasta, add all the meat sauce. Top the meat sauce with the remaining pasta. Pour the cream sauce on top spreading evenly over the pasta. Sprinkle with remaining cheese.

Bake for 50 minutes or until golden brown. Let stand 1o minutes before serving.

Enjoy!!!


Thanks for visiting!
Leave a comment so I can get to know you.

Wednesday, April 14, 2010

GUACAMOLE - MY WAY!

There are certain things I absolutely Ka-raave at times, and one of those is guacamole. Avocados were on special at the store last Friday, so I bought a bunch. Yesterday, after a quick trip to Walmart for, well, essentials
. . . more plants, spray paint, spanish moss,
cute melamine plates

that were on sale
(those are all essentials, right?) . . .
I decided to make some quac.

I prefer chunky guacamole with bits of extras. Now that I think about it, it's pretty much pico de gallo with avocado more than it is plain ole guacamole.

Anyway . . . here are the ingredients . . .

Of course, a couple yummy, perfectly ripe avocados.

Chopped tomatoes and red onion. Minced garlic and jalapeno. I don't care much for cilantro, so today I used flat leaf parsley.

A good pinch of kosher salt, along with a generous squeeze from a fresh lime.


Oh, had to share. Isn't my garlic crock just the cutest??? :o)

Mix all the delicious, fresh ingredients and enjoy . . . with baked tortilla chips, of course!


And since it was another gorgeous day yesterday, I dined al fresco on my deck with my two newest book buys. Noooo, I didn't eat the whole bowl, although I could've - easily - for sure! The only thing that could make this lunch any better would be a nice, icy cold Margarita on the rocks.
Darn . . . if it wasn't the middle of the afternoon in the middle of week . . .
I know, those who know me personally are cracking up at that comment, right?! ;o)

Another great book up there,
"Pretty Little Presents".
Some super-cute projects in there I can't wait to make.

Oh, and some exciting news! I was the super-duper lucky winner of this fantastic book

courtesy of Shellagh from
Thanks so much for this great prize, Shellagh! Annndddd, she even showcased a few of my last post's pics on her winner announcement post. I must say I was a little surprised when I clicked over to her blog to thank her, and saw my bed sheets flying on the clothesline! :o)

I was very honored and humbled that she took the time to mention my blog so nicely. Can't wait to get that book in my hot little hands! Oh, another funny . . . well sorta funny thing . . . is I didn't realize I already have one of Christina's books!

I almost forgot about it
GASP!!! :-o
I purchased it sometime last year at JoAnn's, I think. It's chock full of beautiful projects.

I've also had this book of her's on my Amazon wishlist for some time now.

Mmmm, I may need to click "add to cart" for that one sooner than later . . .


Oh, and one more thing, my good friend Tracy has started her own blog

She's just starting out with only two posts, one showcasing her sweet poochies. This girl has a definite "get'r done" work ethic. She's tackled re-upholstery projects, furniture refinishing, laying hardwood floors, scrapbooks, is quite crafty, etc. . . . and she works 40-plus hours a week at her "real" job. We all remember how it was just starting our blogs, wondering if anyone out there knew we existed. Knowing that at least a few people viewed helped keep us motivated to post.
So go say hello to Tracy. Tell her I sent ya! ;o)


Thanks for visiting!
Leave a comment so I can get to know you.
Related Posts with Thumbnails