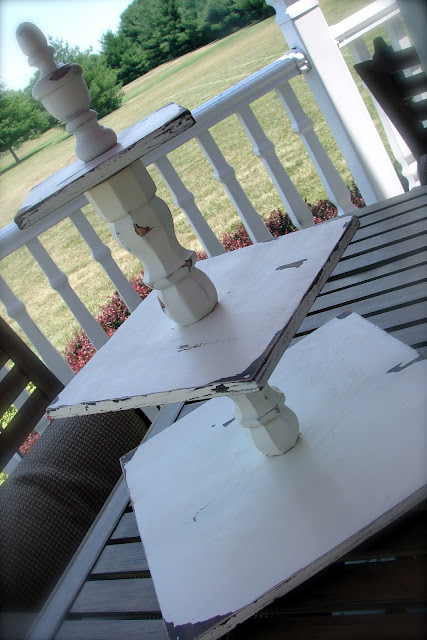
I'm so excited to share this relatively quick and easy project with you.
As a lover of cupcakes ~ baking and eating ;o) ~ I have always wanted a pretty way to display those luscious, tiny round cakes.
I've had a couple inexpensive stands that just did not hold up. And being the cheap thrifty person that I am, I could never bring myself to pay oogles of money for a really nice one.
Well, after perusing the net one day a while back, I stumbled upon this great stand handcrafted at
Shanty 2 Chic's blog.
Isn't it just gorgeous??!!!!
Click here to read how Ashley created this beauty.
It became my inspiration.
The only hurdle was not having any of the proper woodworking tools to make it.
No worries!
I made a trip to Lowe's, bought an appropriately sized piece of maple plywood, and asked the nice lumber boy to cut it into the sized pieces I needed ~ 6, 10 and 14 inch squares. Another trip down the furniture pieces aisle and I grabbed a few chair legs with screw plates. I'll explain the reason for the screw plates in a bit. And lastly, I grabbed a decorative finial for the top. The only other supplies needed were a few cans of spray paint, and a trip to AC Moore Crafts for small unfinished wood candle holders for the feet.
After tallying up the cost of supplies purchased, I estimated the entire project to be around $30.
Not too bad!
I wish I could say I crafted this all by myself, but Hubby did attach the screw plates to the bottoms of the top and middle tiers; although, I sooo could have done it all by myself. You know . . . he's a dude . . . and there was a bit of power tool usage needed for the project . . . so . . . he had to get involved.
Now, the reason for the screw plates and chair legs is, as you may have guessed, so I can break it down for storage if needed. Pretty smart, huh?!
The rest of the project was all me. I sanded, primed, painted, distressed, antiqued, etc. Speaking of antiquing, I used the vaseline technique to antique it.
Again, refer to Shanty 2 Chic's blog for a tutorial on that method. No sense reinventing the wheel here since they've done a great job explaining it on their blog.
It really was a very simple project. Oh, I think I would have loved for it to be round, but not having the proper tools to make it round, I think it looks pretty okay being square. Besides, everyone has a round cupcake tower, so mine is a little different :o)
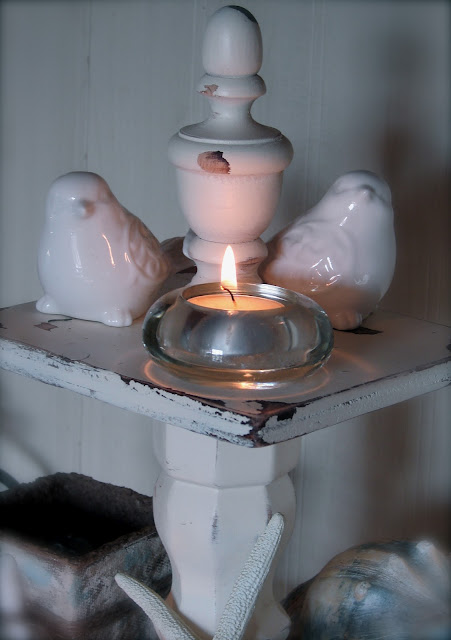
And, when it's not displaying yummy cupcakes, I can use it as cute centerpiece, or in this case on my hutch decked it out with some beachy-inspired elements.
I was able to get this stand finished for my niece's bridal shower this past weekend. She seemed a little disappointed that it wasn't hers to keep, so I think I'm going to have to whip one together for her.
Thanks for visiting!
Leave a comment so I can get to know you.


10 comments:
Hello--
I have popped over from Kerin's blog to see your stand. LOVE IT!
The round is cute but I like the squares too.
Great Job.
Melinda
I love it, Carla! Very clever using those screw plates so you can disassemble it if needed. Plus, I like that you can use it for other display purposes, too.
What a beautiful project Carla! You did an amazing job and I think it turned out so perfectly! I love it with both the cupcakes and how you have it styled for summer! Happy Monday and have a lovely week! Angie xo
Cute! Cute! Cute!!
You are so creative Carla!!
I like that you made yours square too. It's unique and charming.
Catch ya later...
Kerin
That is fantastic. I may need to revisit this idea for craft shows, would make a great display for that.
Angie
So darling and I love the screw plates! How did you attach the other side of the chair legs? Do they detach completely or are they permanent? Thanks for the awesome project!
absolutely love this. have all my pieces here but cannot for the life of me work out how to put it together. as 'Unknown' above said how did you attach the leg end without the screw. please help me.(us).
Please share your secret about how you attach the other end without the screw.
I'm going to make this tonight and I figured out how to attach the other end of the leg without the screw - just drill a pilot hole directly through the board and bottom of the leg base, then screw them together. Make sure you drill the pilot hole though, so you don't end up splitting the leg. And make sure the pilot hole is a little smaller than the diameter of your screw.
This project sounds like something that would look great at home.
Post a Comment